
Applicable Models
The instructions provided below are for the following MacBook Pro (13-inch) models:- MacBook Pro (13-inch, Mid 2012)
- MacBook Pro (13-inch, Late 2011)
- MacBook Pro (13-inch, Early 2011)
- MacBook Pro (13-inch, Mid 2010)
- MacBook Pro (13-inch, Mid 2009)
Memory specifications
Use the tables below to confirm the memory you're installing is compatible with your MacBook Pro.| MacBook Pro (13-inch, mid 2012) | |
| Number of memory slots | 2 |
| Base memory | 4 GB |
| Maximum memory | 8 GB |
| Memory card specifications | - Double Data Rate Small Outline Dual Inline Memory Module (DDR3) format - 67.6mm x 30mm (1.18 inch) - 2 GB or 4 GB - 204-pin - PC3-12800 DDR3 1600 MHz type RAM |
| Additional notes | For best performance, fill both memory slots, installing an equal memory module in each slot. |
| MacBook Pro (13-inch, Late 2011) and MacBook Pro (13-inch, Early 2011) |
|
| Number of memory slots | 2 |
| Base memory | 4 GB |
| Maximum memory | 8 GB |
| Memory card specifications | - Double Data Rate Small Outline Dual Inline Memory Module (DDR3) format - 67.6mm x 30mm (1.18 inch) - 2 GB or 4 GB - 204-pin - PC3-10600 DDR3 1333 MHz type RAM |
| Additional notes | For best performance, fill both memory slots, installing an equal memory module in each slot. |
| MacBook Pro (13-inch, Mid 2010) and MacBook Pro (13-inch, Mid 2009) |
|
| Number of memory slots | 2 |
| Base memory | 4 GB |
| Maximum memory | 8 GB |
| Memory card specifications | - Double Data Rate Small Outline Dual Inline Memory Module (DDR3) format -30mm (1.18 inch) - 2 GB or 4 GB - 204-pin - PC3-8500 DDR3 1066 MHz type RAM |
| Additional notes | For best performance, fill both memory slots, installing an equal memory module in each slot. |
Removing or installing memory
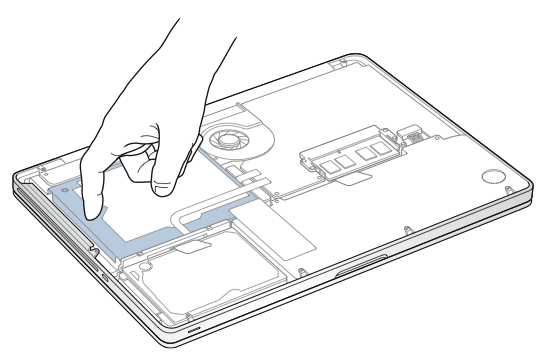
Warning: The internal components of your MacBook Pro can be warm. If you have been using your MacBook Pro, wait ten minutes after shutting down the computer to let the internal components cool before continuing.Step 1: Remove the bottom case
- Shut down your MacBook Pro. Disconnect the power adapter, Ethernet cable, USB cables, security lock, and any other cables connected to the MacBook Pro to prevent damaging the computer.
- Turn over your MacBook Pro and remove the ten (10) screws that
secure the bottom case. Because the screws are different lengths, note
the screw lengths and locations so you can replace the screws correctly.
Put them aside in a safe place. Lift off the case and place it to the
side.

- Touch a metal surface inside the computer to discharge any static electricity from your body.
- Push the levers on the sides of the memory module in an outward direction to release the module from the memory card slot. The memory pops up at an angle. Before removing it, make sure you find the half-circle notches. If you don’t, try pressing the levers outward again.
- Hold the memory module by its notches and remove it from the slot.
- Remove the other memory module.
Important: Hold the memory modules by their edges, and do not touch the gold connectors.

- Align the notch on the gold edge of the module with the notch in the lower memory slot.
- Tilt the card and push the memory into the slot.
- Use two fingers with firm, even pressure to push down on the memory module. There should be a click when you insert the memory correctly.
- Repeat this procedure to install an additional memory module in the top slot. Press down on the module to make sure it is level.

Note: Make sure you install the memory according to this illustration, with the gold contacts inserted almost completely into the connector.
Replace the bottom case. Replace and tighten the ten screws you removed earlier, making sure to put the different length screws in their proper locations. "သုတကမၻာ"


thanks for the sharing information with us its very helpful for me :D Mac Memory Upgrade ?
ReplyDelete